• Home
  • Contact
  • Privacy Policy
  • Disclaimer
  • DCMA
  • Terms
  • cancer science review

    Non-flimsy full height, 24" wide recycling and trash cabinet

    Posted by Unknown Posted on 9:08 AM with No comments

    Materials: Akurum kitchen cabinet, drawers, jigsaw, drill.

    Description: Ikea's kitchen cabinets are great, but their recycling center is limited to an 18" wide cabinet with a drawer above. That's not tall enough and if you use a full height door, when you pull the handle, the whole door flexes outward. And at 18" wide it's just not big enough for a family's trash and recycling.

    SOLUTION: Use a 24" wide cabinet with full height door panel and an extra drawer kit. Don't buy the Ikea recycling kit, use standard Sterilite laundry bins instead.

    1. Attach your bottom drawer to the door panel per the instructions and template and your rails into the cabinet. You can now install the assembly into the cabinet and it will slide in and out.


    2. Stand your bins sideways (see photos) so there is an even gap to the front panel, back of drawer and between the two bins. This will allow enough wood when we come to cut the upper drawer base.

    3. Offset the bins sideways, which when finished will allow for a roll of trash bags to sit in the bottom.

    4. Assemble your second drawer without the base / floor in it. With your door open and the bins in place, hold the drawer (maybe need a friend for this) around where you plan to install it to determine which holes your rails should go in. Mark inside the cabinet, install your rails and fit the drawer without the base in it. The drawer should slide in and out.

    5. Slide the upper drawer forward until it hits the cabinet front and mark where you will attach it to the door / front. This is a little tricky and is best done with the door as closed as possible so the drawer is sitting rigidly in the rails and not drooping down at full extension.

    6. Re-use the Ikea template from step one to finalize your drawer attachment points on the door. Drill the holes and attach the drawer to the door front and check the operation. Your drawer base will still be missing.

    7. Mark a line from the bottom of the upper drawer onto one bin. This is the level that the bin passes through the drawer base. Measure the depth and width of each bin and draw the outline on your drawer base. If in doubt make it a little small at first as the wood is easy to enlarge with a rasp. Cut your holes with a jigsaw.

    8. Detach the upper drawer from the door and slide in the drawer base. You may need to remove the door completely first to get the board to slide in. Reattach everything.

    The bins should drop into your two holes in the upper drawer base. If the bins don't sit all the way in the bottom drawer, your holes may be too small. Enlarge them a little with a rasp.

    ~ Patrick Ryan, San Diego
    Read More »
    FACEBOOK DIGG TWITTER GOOGLE+ LINTASKAN STUMBLEUPON

    Walk through Pantry

    Posted by Unknown Posted on 4:35 AM with No comments

    Materials: Akurum and Adel

    Description: We had a horrible time with our pantry, we bought cheap shelves that didn't work so finally we decided to buy an Ikea kitchen, install it and build it such that it looked like a custom made butlers pantry.


    We trimmed it out and added crown molding to make it appear as a built in and to give it a nice finish. I used 30" and 24" Akurum cabinets - 88" inches tall.

    ~ Mark, Calgary, Alberta
    Read More »
    FACEBOOK DIGG TWITTER GOOGLE+ LINTASKAN STUMBLEUPON

    Cat cubby window seat with Ikea Akurum Kitchen Cabinets

    Posted by Unknown Posted on 11:11 AM with No comments

    Materials: Akurum Abstrakt kitchen cabinets and Ikea red pillows

    Description: Akurum Abstrakt 36" wide x 24" deep x 15" high cabinets, which would normally be used above a refrigerator, were placed on the floor on a 1-1/2" high base covered with a matching Akurum base kick ripped down to size.


    Holes were cut in fronts of 2 of the doors in the corner cabinet and trimmed out with the iron-on Ikea trim strips. The 2 kitty cats in the household each have their own cubby space with red Ikea pillows inside the corner cabinets.


    Additional cabinets of the same size are installed around the remainder of the room perimeter and topped with custom cushions and red Ikea pillows to make window seats with storage inside the hinged door Akurum Abstrakt cabinets.

    ~ Lynn Bichler Architects, Mequon, Wi
    Read More »
    FACEBOOK DIGG TWITTER GOOGLE+ LINTASKAN STUMBLEUPON

    Breakfast bar/home office desk

    Posted by Unknown Posted on 12:24 PM with 1 comment

    Materials: AKURUM kitchen wall cabinet + LINNMON table top + cover panel

    Description: We needed a dining table and home office desk in a very small area. Also needed storage space for office that wouldn't look cluttered.

    Bought AKURUM kitchen WALL CABINET in the wood finish that matched existing furniture. We chose the 30" high X 39" wide cabinet and assembled it and sat it on the floor as the base of the table/desk. We could have bought short legs or built a base to raise it up higher, but chose not to because our existing stools were the right height to leave it as-is.

    If you want to install doors to hide the shelves, you WILL need legs or a base for it so that the bottom edge of the doors will be off the floor. This wall cabinet has many holes pre-drilled for adjustable shelves so we bought 2 pairs of shelves that fit the entire width and installed them where we wanted (pegs are included with shelf purchase).


    We bought a "cover panel" from the selection of cabinet doors and cover panels that also matched the existing furniture - we glued that on the back side of the cabinet since that side normally mounts on the wall and is not "finished".

    There are several finishes to choose from. In order to be the right size, we bought one that had to be turned sideways and then we sawed off one edge that would be up against the wall, so it didn't need to be a "finished" edge. There are several sizes of wall cabinets and several sizes of doors or cover panels, so find the size and color you want.

    Next, we found a LINNMON table top in black-brown that matched our stools (several colors are available). The size we choose for our space was about 24" X 48" and we placed that on top and positioned it where we wanted (a little more overhang on one side worked for us).

    We attached it by drilling up through the top of the "cabinet" with wood screws. You can't see in the picture, but for an added effect, we installed a strip of Ikea's LED lights under the overhang on the finished side of the breakfast bar/desk. Perfect for home office and perfect for dining - fits in a very small space and the shelf contents stay hidden from view.

    ~ Rebecca & Manny, Orange Co. CALIF
    Read More »
    FACEBOOK DIGG TWITTER GOOGLE+ LINTASKAN STUMBLEUPON

    DIY Fauxdenza from Ikea Kitchen Cabinets

    Posted by Unknown Posted on 7:05 AM with No comments

    Materials: Akurum Wall Cabinets, Applad Doors, Birch Plywood, Walnut Stain

    Description: I wanted a streamlined, and narrow solution for my media center. I have seen fake, floating credenzas on the web (dubbed a "fauxdenza") and decided to give it a try!

    The 13" depth of the kitchen cabinets was perfect for my awkward space, and the kitchen storage was just what I needed to hide all of my DVDs and components!

    I mounted the Akurum wall cabinets about 8 inches above the floor, so that the credenza was floating off the floor. Since the kitchen wall cabinets are not meant to be seen from above, I used birch plywood (edges veneered and stained in a dark walnut) to wrap the top and sides of the cabinets, to both hide the screws, and to add a natural element to the sleek white cabinet doors.


    I did this entire project all by myself, and it took me about 4 hours total. If I had had someone helping me, this could have easily been done in 2 hours or so.

    Total cost was around $300! I am more than thrilled with the outcome! :)

    See more of the AKURUM fauxdenza.

    ~ Shannon Wiemann, Tampa, FL
    Read More »
    FACEBOOK DIGG TWITTER GOOGLE+ LINTASKAN STUMBLEUPON

    Bar Cabinet from wall cabinets

    Posted by Unknown Posted on 8:49 AM with No comments

    Materials: Akurum wall cabinet frame, 30"w x 39"h, Perfekt wine shelf, 9"w x 39"h, (2) Lidi glass doors, (2) glass shelves (comes in a pack of 2 already), Cabinet door hardware, Cabinet door dampers, (3) Boholmen cutting boards, Dioder LED 4-piece strips, Some extra hardware from the spare parts As-Is department, Satta Door Handles in the aqua color, (6) 4" Capita legs, Wine glass rack

    Description: 1) Assemble Akurum wall cabinet frame as instructed. Assemble Perfekt wine shelf as instructed.

    2) Use the male/female bolts you found in the as-is spare parts section- you're looking for 4 bolts no longer than the two frames together (so about 3/4" to an 1") and the size of the already pre-drilled holes in the frame. Line up your two cabinets and clamp together (or recruit friends to hold tight). Drill through the pre-drilled shelf holes in the Akurum frame into the Perfekt frame; two in the top and two in the bottom. Make sure you don't use a hole that the door frame hardware will need - we ended up going 3 holes from the top and bottom to clear those. Attach the two cabinets with the male/female bolts.

    3) Attach the 6 legs to the bottom corners of the Akurum cabinet and the outer corners of the Perfekt cabinet.

    4) Attach the doors as instructed onto the Akurum cabinet, and add the door pulls where desired.


    5) Install the wine glasses rack in the top of the cabinet, place Dioder lighting as desired. I used the holes in the top of the cabinet to string the lighting through the back and not have visible wires. Tape wires in place on back, and Velcro the Dioder remote to the side of the cabinet for easy accessibility.

    6) Determine how much you want your butcher block top to overhang - measure and cut your boards to fit, keeping two edges rounded on either end if desired.

    7) Glue and clamp your cutting boards together, following glue instructions (I used Gorilla Glue).

    8) Sand the entire top smooth, especially around seams. Oil the cutting boards to ensure any water won't warp the top of your bar.

    9) Clamp top in place where you want it, and screw into place from top of Akurum cabinet. This is more to keep from moving than for strength, so large screws are not necessary.

    10) Place glass shelves in cabinet and fill!

    See more of the wine cabinet.

    ~ Cindy, USA
    Read More »
    FACEBOOK DIGG TWITTER GOOGLE+ LINTASKAN STUMBLEUPON

    12" Depth Bathroom Vanity

    Posted by Unknown Posted on 11:26 AM with No comments

    Materials: 4 AKURUM Wall Cabinets, LILLÅNGEN Sink, RÖRSKÄR Faucet

    Description: My customer needed a shallow bathroom vanity to increase the available space in her bathroom for her disabled mother.

    Cost was also an issue.

    I used 2 full length AKURUM wall cabinets (12" depth) and 2 smaller over the refrigerator type AKURUM cabinets to create a hanging vanity. Also to allow airflow from a poorly placed heating vent.

    The top is made from tha same mosaic tiles I used for the shower floor. (She needed a zero entry barrier shower due to her wheel chair)


    Total cost for the vanity was:

    Sink $93.00
    Faucet $43.00
    Cabinets: $130.00
    Doors: $94.00
    Handles: ~$20.00
    Tiles: 8sqft @ 4.20 = $34.00
    Misc : $25.00

    Total: $439.00

    That is the retail price, although I picked most of this stuff up in the ASIS section, it ended up costing me about $280 and some effort.

    ~ Lord_Piot, Ottawa, ON, Canada
    Read More »
    FACEBOOK DIGG TWITTER GOOGLE+ LINTASKAN STUMBLEUPON

    Akurum tip out sponge soap drawer

    Posted by Unknown Posted on 8:51 AM with No comments

    Materials: Akurum sink base cabinet

    Description: Installed tip out sponge soap drawer under sink cabinet by using a kick plate from center top to bottom to connect the tip out drawer hardware (hinges). ..since Ikea did not offer this tip out drawer for soap and sponges which I really wanted.


    My husband figured out how to get them in for me because he loves me. I got the hardware and trays at a local home improvement store. Also sold online (example Rev-A-Shelf Sink Cabinet Tip-Out Soap Trays ).

    ~ Ginny, North Dallas
    Read More »
    FACEBOOK DIGG TWITTER GOOGLE+ LINTASKAN STUMBLEUPON

    Horizontal vent hood, wine rack / bookshelf mash up

    Posted by Unknown Posted on 4:07 AM with No comments

    Materials: AKURUM horizontal, PERFEKT wine shelf and Broan PM250

    Description:
    1. Assemble the "box" of the horizontal cabinet.
    2. Flip over and apply the Broan PM250 template to bottom of cabinet.
    3. Since cabinet is shallow, favor the front edge with your template, about 1/2" from the front.
    4. Center your template left/right and trace.
    5. Drill pilot hole in template and using a jig saw cut out template, careful with pressure alone the front edge.
    6. Screw and mount the Broan PM250 to bottom of cabinet.
    7. Measure the distance between the 7" duct pipe and the side of cabinet (to gather your wine rack / book shelf sizes) - important to note the wall mounting brackets and hinges will require space, account for their allowance and note shelf widths.


    8. Time to build the boxes... Open up the PERFEKT wine shelf, note the box measurements from measuring off the duct work and allowance for mounting bracket / hinges
    9. On wine rack, make sure you align the divider to be centered within the box you are building (this requires adjustment as the standard placement is not centered in your new boxes)
    10. Assemble wine box and cook book box
    11. Apply metal tape to the boxes to ensure no discoloration due to proximity to ducting
    12. Install hinges and tight so they are at heaviest setting, also make sure to install wall mounting brackets
    13. Mount boxes to horizontal cabinet using 1 x 3 studs and screws, measure and align so they are symmetrical
    14. Install some air conditioner window foam to prevent future vibrations due to vent
    15. Cut out 7" hole in back panel and also cut out the 7" hole in your wall where exhaust will connect to.
    16. Carefully measure and template exact location of boxes and apply template to ABSTRAKT high gloss white panel
    17. Measure again
    18. Measure 3 more times
    19. Using the same method as the bottom vent hood cut out, flip ABSTRAKT panel over and drill pilot hole (make sure pilot hole is at least 1" from intended cutout line, the hole will "explode" on the finished side of the panel) - have faith in your jig saw, don't worry too much on being absolutely accurate on your cut outs
    20. Mount your panel to the horizontal cabinet and test for cut out accuracy.
    21. Go to Home Depot or Lowes and purchase 1/2" aluminum corner mold for ~$9.00
    22. Measure your openings (measure 3 more times) and miter cut the aluminum with chop saw, no special blade needed.
    23. Drill pilot holes into the aluminum, then lightly use a larger drill bit to achieve counter-sink screws
    24. Apply liquid nails glue and align and screw aluminum to your openings. This will hide any imperfections you made during your jig saw cut outs.
    25. Reattach panel and have a friend help you attach the box to the wall, since mounting brackets are difficult to access, all bolts must be attached before mounting to wall and then the box must be held on an angle and slid down the rail.
    26. Use a socket wrench to tighten bolts.

    ~ Nick A., Boston, MA
    Read More »
    FACEBOOK DIGG TWITTER GOOGLE+ LINTASKAN STUMBLEUPON

    Rubrik Cabinet Door Storage Solution

    Posted by Unknown Posted on 4:46 AM with No comments

    Materials: Rubrik glass cabinet door, Akurum wall cabinet frame, Besta media cabinet

    Description: I found these Rubrik glass cabinet doors on clearance at Ikea for $5 each, while in the midst of a basement renovation. We were looking to add built in storage as well as hide an ugly gas meter, and these doors were perfect. They were 39", so they could only be used as wall cabinets. We ended up hanging 4 30x39" Akurum wall cabinet frames 1" off the floor against the back of the room.


    The cabinet tops themselves were not meant to be seen, so we created a waterfall counter by joining a 1" x 12" piece of pine board (which is actually 11 1/4") with a 1" x 3" (which is actually 2 3/4"), by screwing the pieces together from the back with decking screws, thus enabling the counter to reach the depth of 13" of the Akurum frame and Rubrik door. This allowed for a slight overhang, and then we screwed the same things into the side of the cabinets. Before attaching the counter I stained it with Minwax Kona stain, and then sealed it with Minwax Paste Finishing Wax, to make the counter water-proof.


    Hiding the gas meter was a bit trickier, and was accomplished by our contractor, who complained and threatened to charge us double the quote for the labor, but in the end he even agreed that it came out very nicely. He hung one Akurum 36" x 39" frame and built a wood frame around the gas meter next to it. He then sheet-rocked in the frames, and hung the doors. He had to use sheetrock rather than just hanging the cabinets because of the size of the gas meter. Beneath it we hung a Besta media cabinet.

    ~ Michelle Servary
    Read More »
    FACEBOOK DIGG TWITTER GOOGLE+ LINTASKAN STUMBLEUPON

    Bathroom vanity hack: Optical illusion with secret storage space

    Posted by Unknown Posted on 4:33 AM with No comments
    before

    Materials: Akurum kitchen cabinets, Nexus doors, Bastig knobs

    Description: We turned our powder room into a full bath by adding a shower. Since our room is only about 6x6.5 ft, we had to get creative when it came time to build a vanity.

    1. I wanted the vanity to have BIG impact to off-set the new shower. I wanted you to not really notice the shower that much.

    2. I needed clearance for the toilet.

    3. I wanted storage in my small space. Lots of storage.


    To create a big impact I wanted the vanity to span the entire wall, but I knew that with the clearance issues for the toilet, I could not make it very deep.


    Our solution was to use two AKURUM wall cabinets, which are 12 inches deep. We went with the ones that are 24 inches tall.

    We chose a vessel sink that would over hang the cabinets for a more modern look.

    After hanging the first cabinet for the sink, we needed the second cabinet to be much less deep. I measured a toilet roll and settled on a 6 inch depth for this cabinet.

    The cabinet was cut all the way around and we attached the back to the more shallow cabinet before hanging it.

    The table top we made out of 3/4 solid oak flooring with 1x2 oak trim. Then I stained it (4 layers) of ebony stain, then gave it three coats of satin poly.

    You can read more about our powder room turned full bath here.

    ~ Katja @ Shift Ctrl ART, California
    Read More »
    FACEBOOK DIGG TWITTER GOOGLE+ LINTASKAN STUMBLEUPON

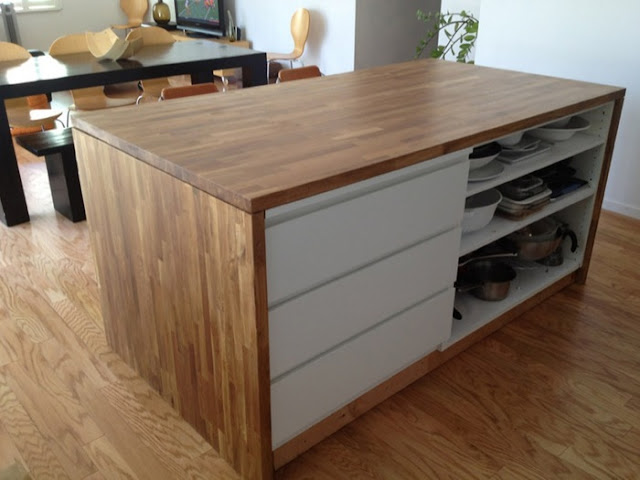
    MALM meets NUMERAR Kitchen Island

    Posted by Unknown Posted on 11:39 AM with No comments

    Materials: MALM, NUMERAR, AKURUM

    Description: My wife and I recently bought our first house. Yay! As you can imagine, living in L.A. means housing is very expensive, and we didn't have very much left in our budget to renovate the new house as much as we would have liked to.

    One of the things we knew we wanted to concentrate on was creating as nice a kitchen as our dollars would let us. So that meant the usual suspects: IKEA cabinets, cheaper countertops (we wanted Ceaserstone), and less cabinetry. We also kept the stove that came with the home as we did not have the Benjamins to splurge on a new one. We also kept our old refrigerator. The only appliance we bought new was the dishwasher, also from IKEA.

    I'd like to show you how we took $559 and made ourselves a pretty cool island that we love.


    1. First, we outlined the footprint of the island, 3'x6' with Blue painters tape. FYI, the kitchen is not finished in these photos.


    2. The next step was to build a frame base. Here we used 2x4s that are held down with angle brackets. Do you see the dresser under the window? That is an IKEA MALM bedroom dresser that we will be using as part of our island.


    3. Once the base was built, we attached the MALM dresser. To the left of the dresser (as seen in this view) is an IKEA base cabinet. We found it in AS IS at IKEA and it was in rough shape as you can see. We snatched it up for $10!!

    4. With both bases in, we can now move on the next step: the sides and top.

    5. For the sides and the top we decide to use IKEA wood countertops. We purchased two; each one is 3'x6' basically. We cut one right in half, and voila, the sides of the island!


    6. The top is, you guessed, a full sheet of the IKEA wood countertop. This is so heavy, we barely had to fasten it in place much, we just used two brackets on either end, tucked away inside so you can't see them.

    7. For the face of the island, we attached a piece of 1/2" plywood to the 2x4 base and the back of the cabinets. We then used a sheet of vinyl wall panel (called Plas-Tex) that we picked up at Lowe's. It is attached with Liquid Nails, that's it. So far, its held up well. Easy to clean kick marks too!

    8. This is what the other side looks like. the MALM drawer gives it a very refined look we think. The only thing left to do is to add some shelving on the right and a toekick.


    9. Yes we would have liked to have some doors here instead of exposing the pots and pans, but the budget wouldn't allow it. Nobody sees this side as much anyway so we're ok with it.

    Well, there you have it, our $559 kitchen island. Hopefully, it will inspire you to do something you're happy with, and not spend too much money doing it. I did sand it and seal it when it was all put together of course.

    Here is a list of the items we bought (with prices, rounded to the nearest dollar) with links, if available:

    (3) 2x4s (10'), Lowe's, $8.40 + tax = $9
    (2) Countertops, IKEA Numerar $390 + tax = $424.
    (1) IKEA Malm dresser, $69.99 + tax = $76
    (1) IKEA Base Cabinet, (AS IS), $9.99 + tax = $11
    (2) Shelves and back of island, Lowe's, made from (1) 4'x8' sheet of 1/2" plywood, $15.97 + tax = $17
    Plas-Tex Vinyl Sheet, Lowe's, $19.98 + tax = $22
    Total: $559

    See more of the customised kitchen island.

    ~ Danny Cerezo, Los Angeles, CA
    Read More »
    FACEBOOK DIGG TWITTER GOOGLE+ LINTASKAN STUMBLEUPON

    With FAKTUM/AKURUM in the Bathroom

    Posted by Unknown Posted on 8:04 AM with No comments

    Materials: FAKTUM/AKURUM cabinet, HÄRLIG fronts, PRÄGEL Countertop, CAPITA Leg, sink (TOOM hardware Store)

    Description: I used 3 FAKTUM/AKURUM cabinets 60x57x37cm (for extractor fan) with shortened and cut PRÄGEL countertop (186cm), HÄRLIG fronts and ATTEST handles. I screwed the rest of the countertop vertical on the backside and mounted the sink in the middle. The legs are CAPITA 4''. The water pipe installation is located in the middle cabinet.


    On the wall I used 2 horizontal FAKTUM/AKURUM cabinets 92x40x37cm also with HÄRLIG fronts and ATTEST handles. Underneath I screwed another cut PRÄGEL countertop (186cm) with the wiring for the lights and socket inside.

    Clean look and a lot of space inside for only 300,- EUR.

    ~ G. Böhm Erfurt, Germany
    Read More »
    FACEBOOK DIGG TWITTER GOOGLE+ LINTASKAN STUMBLEUPON
    Older Posts
    Powered by Blogger.

    Blog Archive

    • June (81)
    • July (100)
    • August (94)
    • September (74)
    • October (456)
    • November (275)
    • December (178)
    • January (257)
    • February (176)
    • March (185)
    • April (191)
    • May (207)
    • June (114)
    • July (223)
    • August (116)
    • September (71)
    • October (152)
    • November (49)
    | Contact | Privacy Policy | Disclaimer | DCMA | Terms |
    Copyright © 2013. cancer science review - All Rights Reserved
    Designed By Latest K-Pop News And bloggerspherepedia
    Proudly Powered By Blogger