• Home
  • Contact
  • Privacy Policy
  • Disclaimer
  • DCMA
  • Terms
  • cancer science review

    Gulliver Mini Crib

    Posted by Unknown Posted on 7:55 AM with No comments

    Materials: Ikea Gulliver Crib, Bassinet Mattress

    Description: My wife and I are expecting a second baby in a couple of months and we've naturally been rearranging our home accordingly. Like most people in New York City, we live in a small apartment, so the placement of furniture is like a game of Tetris. The new baby will be sleeping in our bedroom for the first six months or so, but since there's no way that a full size crib will fit, we needed to find a smaller solution.

    We looked at various mini cribs on the market and they were all slightly too big for the space in our room. We also looked at bassinets and decided that they were all either too ugly or too expensive. So we decided to build our own mini crib.


    I picked up a good, used Gulliver crib from eBay and then checked the interweb to see what mattresses were available. We settled on a 15" x 33" bassinet mattress and placed the order. With my target dimensions for the crib dictated by the mattress, I started measuring and marking up the crib.

    The long side pieces are the easiest to modify. Using a handsaw, I cut them down to 33" in length and then drilled new holes for the dowels, bolts and cylindrical nuts. I used a doweling jig for accuracy. If you don't have one of these, get one, they're great.

    The end pieces are slightly harder to modify. As shown in the diagram, I cut at two of the joints through the wooden dowels to separate the end piece into two pieces. I then shortened the remaining large end piece so that the top cross bar was longer than the lower. With the aid of the doweling jig again, I drilled new holes for dowels and glued the shortened end pieces back together. When the glue was dry, I drilled new holes for dowels and bolts. I also used the opportunity to add two more sets of holes for the base piece so we could have the mattress higher than Ikea intended.

    The last piece to modify was the base upon which the mattress would sit. I used my circular saw to reduce the size to 15" x 33" and then used my handsaw to shorten the cross members by roughly 2 cm. The cross members are just secured by staples, so it's easy to pull them out to rearrange them. I then reassembled the base board and reinforced it with wood screws and a couple of corner brackets. After drilling new holes for the bolts, I was done with the base.

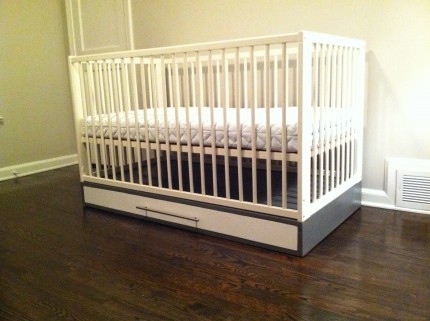
    The mini crib assembled just like the original Gulliver crib, which is to say pretty easily. I used a bit of touch up paint to cover up where I cut through the end pieces, but very little was required.

    The crib will now fit our room and fit our baby. Overall, I'm pleased with the results, although the perfectionist in me slightly annoyed by the lack of symmetry in the bar spacing. Oh well, I think I can live with it.

    ~ Doug, Brooklyn
    Read More »
    FACEBOOK DIGG TWITTER GOOGLE+ LINTASKAN STUMBLEUPON

    Simple crib with storage

    Posted by Unknown Posted on 8:51 AM with No comments

    Materials: Ikea Gulliver Crib

    Description: We bought the Gulliver crib from Ikea for $100 and we went to the hardware store and loaded up on lumber. He removed the legs of the crib and built a drawer to form a new base. The end result? The most awesome crib, ever!


    See more of the crib with storage.

    ~ Emily
    Read More »
    FACEBOOK DIGG TWITTER GOOGLE+ LINTASKAN STUMBLEUPON

    Toddler Captains bed

    Posted by Unknown Posted on 4:08 AM with No comments

    Materials: 1 x Gulliver bed. 6 x Vikare Guard Rails. 2 x Besta cabinets. 2 x Besta Cabinet doors. 2 x drawer kits. Drill. Screwdrivers. Fine toothed saw. Optional - Kreg Pocket hole drill jig.

    Description: After no luck finding any company that makes a toddler sized platform bed, I decided to make one. There are lots of full-size storage/platform/captains beds, but no kiddie ones. My little girl is just about to turn two, and she's a climber, jumper, and all round monkey. She also has no issues rolling out of bed. If you make this for you kid, make sure they are ok climbing in, out, and sleeping in it. The height from the floor to the top of the mattress pad is 21".


    1: Assemble the Gulliver bed frame. Leave the mattress support slats off for now. Note that you need to leave off the two metal tie rods that link the front and back of the bed, as well as the four screws that prevent the bed slats from sliding around. These would all interfere with the cabinets. I chose to just screw the bed slats down once complete. It serves the same purpose. (Prevent frame flex and slats from sliding).

    2: Assemble the two Besta cabinets. Don't put doors or any internal parts for shelves or drawers on them.

    NOTE: These are are the Besta units of the following measurements:

    Width: 23 5/8 "
    Depth: 15 3/4 "
    Height: 15 "

    I went with the plain white (not gloss) as it matches the slightly matte finish of the bed. They should be $40 each.

    3: Measure and mark up. Prop the bed frame so that the two cabinets are under each side of the front of the bed. Use the two doors to prop up the back temporarily. The unfinished wooden rail that the mattress slats sit on is what will rest on the cabinets. With the cabinets slid as far to each side as they can go, and butted up to the front frame, mark up the inside of the legs for where to cut.


    4: Cut the legs. Note that the legs are not a straight-forward cut. The front is cut to the level of the front of the bed frame. Then there is a notch up that's cut to the same height as the wooden mattress slat frame. NOTE: the wooden bar is not quite level with the side of the bed frame. The side is about 1/8 of an inch higher. Cut to the level of the wooden bar, not the bed side. Note in the picture the slight gap it leaves. The easiest way to do this is to cut the lower cut all the way across. Once you have the shortened frame end, you can cut the vertical cut in from the end and the higher horizontal cut from the back side to cut out the notch.


    4A: cut the rear legs. I made the rear legs out of two sections of one of the doors cut to size. NOTE. The doors are a few eighths of an inches shorter than the cabinets, so you can NOT just cut a couple of strips for new back legs. Cut and measure two correct length legs from the door turned vertical. Or make legs from some scrap wood if you like, so long as they are the same height as the cabinets.

    5: Screw main parts together. Slide the cabinets under the bed so they now sit in line with the end of the bed frames. (Refer to that close-up picture again). Screw the bare wooden frame to the cabinets. I chose to do this from underneath, and countersunk the holes. That way screw heads will not interfere with the bed slats.

    5A: Screw the back legs on. With bare wooden rail resting on the legs, screw the legs into the frame from the front.

    6: Finish cabinets. You can now put the drawers and shelves in the cabinets.

    7: Rails. I cut two of the Vikare rails to length so that they left a gap the same width as the gap between the cabinets. With the hardware fitted, the cut end is placed flush against the bed frame, leaving the factory rounded ends in the middle. I re-drilled new holes for the hardware the same distance from the end of the cut section of the rail as the factory holes are from the uncut end.

    8: Ladder. I cut the ladders sides at an angle from the Vikare rails, at the angle I liked aesthetically but also so the steps didn't overlap. Your angle may depend on how far out you want the steps to protrude out. The steps themselves are just straight cuts sections of Vikare guards. To avoid having screws visible on the outside of the rails, I used the pocket hole cutter to drill two hidden holes in each side of each step, on the underside. They are then screwed in through those holes into the sides.


    The ladder is secured to the cabinets using screws through the factory holes where the rail hardware would have been fitted. I used the second door to panel in the the back of the gap between the two cabinets. It's just screwed into the backs of the cabinets with four screws.

    9: Finish. Put the bed slats on the bed and secure the end slats in place to the wooden rail with a couple of screws. Put the mattress on.


    10: Extra steps (Optional). I chose not to panel in the sides completely, behind where the cabinet sides stop. You could buy a couple of extra doors and cut sections to fill the gaps. I also still need to round off edges where I cut parts, so that they will match the chamfered factory edges. I intend to paint them white with matching semi-gloss finish to neaten the whole thing up.

    ~ Luke Nunn, Brooklyn, USA
    Read More »
    FACEBOOK DIGG TWITTER GOOGLE+ LINTASKAN STUMBLEUPON
    Older Posts
    Powered by Blogger.

    Blog Archive

    • June (81)
    • July (100)
    • August (94)
    • September (74)
    • October (456)
    • November (275)
    • December (178)
    • January (257)
    • February (176)
    • March (185)
    • April (191)
    • May (207)
    • June (114)
    • July (223)
    • August (116)
    • September (71)
    • October (152)
    • November (49)
    | Contact | Privacy Policy | Disclaimer | DCMA | Terms |
    Copyright © 2013. cancer science review - All Rights Reserved
    Designed By Latest K-Pop News And bloggerspherepedia
    Proudly Powered By Blogger